Darktable brings advanced, nondestructive photo editing and management to Linux—no subscription or proprietary software required.
Lightroom is Adobe’s photo editing and management app that was designed for photographers to do nondestructive editing (making changes without permanently altering the original image) of digital images. It’s an important piece of software because it makes it possible to not only manage photos but also to retouch them with tools for exposure, white balance, color grading, tone curve, HSL (Hue, Saturation, and Luminance), crop, distortion correction, and more.
Darktable is the open source, cross-platform take on Lightroom that is aimed at nondestructive postproduction editing of raw images. Like Lightroom, Darktable is designed for photographers and is capable of managing large photo libraries.
Keep in mind that Darktable was created to work with raw images. For those who don’t know, a raw image file contains unprocessed data from a camera’s image sensor. A raw image is often referred to as a “digital negative,” and almost always requires a bit of work in post-production to make the image look good. Raw is a proprietary format and yields a much larger dynamic range with better highlights and shadows, superior colors, and more detail than the traditional JPEG option.
In other words, if you want superior image quality, you’ll shoot your photos in raw, and if you want to use raw, you need a tool like Darktable (especially if you don’t want to pay the price for Lightroom).
That’s not to say that Darktable only works with raw images. You can certainly make adjustments to JPEG files, but it’s not really the same because JPEG files have already been processed within the camera, so there’s not much headroom to make adjustments.
Darktable includes features like:
- Non-destructive editing
- 4×32-bit floating-point pixel buffers
- GPU-accelerated image processing
- Professional color management
- Filtering and sorting images
- Supports JPEG, CR2, NEF, HDR, PFM, RAF, and more
- Zero latency and zoomable UI
- Tethered shooting
- Export to low dynamic range formats (such as JPEG, PNG, TIFF)
- XMP sidecar files and a fast database for saving metadata and processing settings
- Automated tasks
With all of that said, how do you install and use Darktable? While I’m not going to get into the thick of color management and other deep-dive editing features, I’ll at least get you up to speed on the application.
Installing Darktable
Fortunately, Darktable is found in most distributions’ standard repositories, so the installation is painless. Here’s how to install Darktable on the main Linux distributions:
• Ubuntu: sudo apt-get install darktable -y
• Fedora: sudo dnf install darktable -y
• Arch: sudo pacman -Syu darktable
If you’re using openSUSE, you have to first add the necessary repository. On Leap, the command for that is:
sudo zypper addrepo https://download.opensuse.org/repositories/graphics/openSUSE_Leap_15.6/graphics.repo
The installation would then be:
sudo zypper refresh && sudo zypper install darktable
If you’re on Tumbleweed, adding the repository is done like so:
sudo zypper addrepo https://download.opensuse.org/repositories/graphics/openSUSE_Tumbleweed/graphics.repo
The installation command is the same as for Leap.
If you’d prefer to use one of the universal package managers, the commands for installing Darktable are:
• Flatpak – flatpak install flathub org.darktable.Darktable
• Snap – sudo snap install darktable
Importing a Library
When you first open Darktable, you’ll want to import a library of images. The images don’t have to already be in the directory you’ll add (you can add them later, and Darktable will pick them up), but you do need to create your first library.
Let’s say you keep your images in ~/PHOTOS. To add that directory, open Darktable and then click the “add to library” button near the top left.
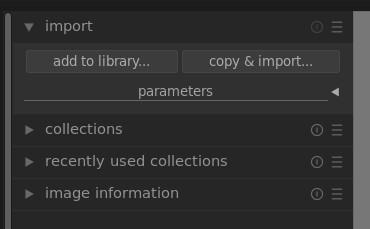
The Darktable import section is in the left sidebar.
You will then need to navigate to ~/PHOTOS and select that directory. Darktable will then automatically (and very quickly) import every photo in that directory, as well as the child directories.
When the images have been imported, they’ll appear at the bottom of the window. You can then locate the one you want to work on, double-click it, and start editing. In the working window, you’ll find all the tools at your disposal.
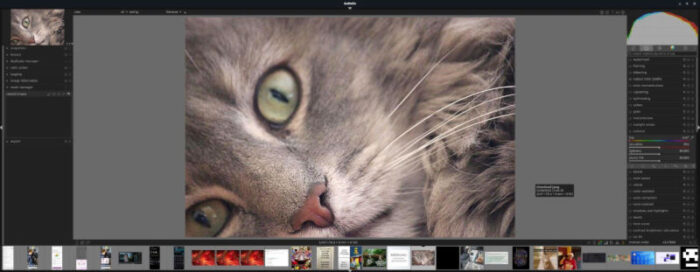
At this point, you are ready to start tweaking your images, and there’s plenty you can do with Darktable. I highly recommend going through the user manual for the version you’ve installed, which can be found on the official Darktable Resources page.
If you’re a budding photographer or a pro, and you want to make the most of your images on Linux, consider Darktable a must.
Jack Wallen is an award-winning writer for TechRepublic, ZDNET, The New Stack, and Linux New Media. He’s covered a variety of topics for over twenty years and is an avid promoter of open source. Jack is also a novelist with over 50 published works of fiction. For more news about Jack Wallen, visit his website.


Thanks.
You might want to mention that Darkable is also available for Windows and MacOS.