The FOSS Force Linux App of the Week — Newelle
With Newelle, you get the power of generative AI right on your Linux desktop—no cloud required (unless you want it). Switch language models on the fly, all on your terms.

Newelle is a great way to not only get answers but also interact with your Linux OS through natural language prompts.
If you’re into AI, Linux has plenty of options for you. You can even install and use local large language models to keep your queries and data private.
One such AI tool for Linux is called Newelle. It’s a gem of a tool: open source and licensed under GPLv3.
Newelle is considered an AI “assistant” because it can do more than respond to queries. In addition to serving as a standard AI app, Newelle can also interact with Linux, use voice chat, do web searches, and (for me, this is the big one) run commands for you.
For example, you could have Newelle create a directory using a simple query like this:

create a FOSSFORCE directory in my home directory
Newelle will do some thinking and eventually create the directory for you.
Of course, you could also just open your terminal window and run the command mkdir ~/FOSSFORCE (or just make a directory in your file manager), but where’s the fun in that?
You could then tell Newelle to rename the new directory with something like:
rename the FOSSFORCE directory in my home directory to FOSS_FORCE
You could even use Newelle to SSH into a server by prompting:
ssh into the 192.168.1.176 with the username jack
There are some configurations you’ll need to complete to make this work, but first, let’s get Newelle installed.

Installing Newelle
To install Newelle, you’ll use Flatpak and install it from Flathub like so:
flatpak install flathub io.github.qwersyk.Newelle
After the installation is completed, log out and log back into your desktop, and the launcher will appear in your desktop menu. Launch the app, and you’re ready to configure the app for first use.
Configuring Newelle
Click on the three-line “hamburger” menu and then select Settings. In the Settings pop-up, click on the General tab. Scroll down to the Neural Network Control section and disable “Command virtualization.”
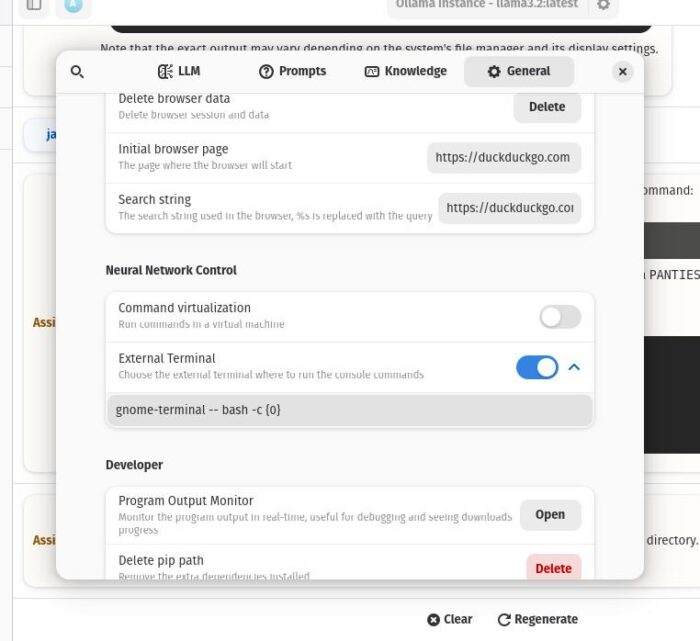
Next, expand the External Terminal entry and make sure you change the terminal command to a terminal you have installed on your machine. For instance, I use Warp Terminal, so I would change the command to:

warp-terminal — bash -c {0}
Next, go to the LLM section and select which Language Model you want. I prefer using Ollama because I know it and it’s generally my go-to.
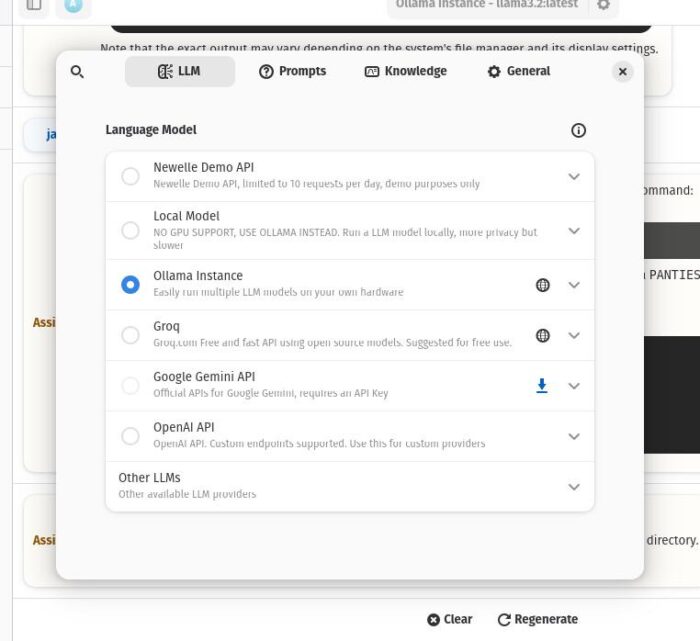
If you go to the Prompts section and “Console access” is disabled, enable it.
You can then close the Settings window.
Using Newelle
Using Newelle is as simple as using any AI tool. Go to the main window, click “Create a chat,” and then type your prompt.
You can also run Newelle in Mini mode, which can be triggered with a keyboard shortcut to provide a smaller window for unobtrusive access without disrupting your workflow. First, however, you’ll need to run the command:

/bin/bash -c 'flatpak run --command=gsettings io.github.qwersyk.Newelle set io.github.qwersyk.Newelle startup-mode "mini" && flatpak run io.github.qwersyk.Newelle'
One thing about this is that the mini mode window doesn’t have a close button, so the only way to kill it is to either end the command with Ctrl+x or run the command:
killall -i newelle
And that, my friends, will get you started on this handy Linux AI assistant.

Jack Wallen is an award-winning writer for TechRepublic, ZDNET, The New Stack, and Linux New Media. He’s covered a variety of topics for over twenty years and is an avid promoter of open source. Jack is also a novelist with over 50 published works of fiction. For more news about Jack Wallen, visit his website.


Would’ve liked to see some examples where Newelle did anything genuinely impressive. Something I couldn’t have done (faster) myself.